miércoles, 26 de octubre de 2016
Carla Soares
sábado, 22 de octubre de 2016
SSH Debian, después de instalar Debian !!
Una de las herramientars indispensables para administrar los servidores es a traves de SSH (Secure SHell) un poco de teoria antes de empezar:
Segun el gran Wikipedia SSH es el nombre del protocolo y programa que lo implementa y sirve para acceder a maquinas remotas a traves de una red esto nos permite manejar por completo la computadora mediante un interprete de comandos pero también puede redirigir el trafico de X para poder ejecutar programas graficos si tenemos un servidor X arrancado.
En lo particular yo soy de instalar los servidores (ftp, web, correo, etc..) en modo texto para no tener un deroche de recusos injustificados entonces desde la instalación del Debian eligo solo los componente basicos y sin X.
Si instalas Debian con entorno grafico por default ya tiene configurado el servicio de OPENSSH-CLIENT pero aqui nos vamos a enfocar en tener listo el OPENSSH-SERVER.
PASOS:
1.-Abrir una terminal como SU y escribir:
2.-Cuando se termina de configurar por default tiene una serie de parametros predeterminados pero podemos cambiarlos si deseamos asi que vamos a echarle un vistazo al archivo /etc/ssh/sshd_config
El archivo es algo extenso solo mencionare las secciones que son de gran importancia:
El servicio SSH por default trabaja sobre el puerto 22 pero se puede cambiar:
El parametro ListenAddress especificamos las direcciones de las interfaces de donde va a recibir peticiones OJO con esta seccion si vamos a accesar desde una red externa como la casa entonces dejarlo como esta sino pues hay que especificar la red:
Esta es la seccion critica a mi manera de ver porque indicamos si el usuario ROOT puede acceder via ssh yo en lo personal lo deshabilito y entro con un usuario del sistema diferente a root
También podemo especificar si se va a ejecutar aplicaciones graficas mediante SSH por ejemplo podemos usar VLC a traves de SSH por si no son muy dados a usar comandos yo lo dejo como esta:
Otra opciones permitir el acceso a ciertos usuarios de la siguiente manera:
En fin son muchas las opciones que trae el archivo seria bueno que le echaran un vistazo y modifiquen lo que mejor crean ustedes que es para su servidor pero siempre pensando en la seguridad y los riesgos que conlleva hacer una mala configuración.
Por último reiniciamos el servicio:
NOTA: Si estan detras de un firewall tienen que abrir el puerto que han especificado pero si estan en DMZ pues les recomiendo que pongan reglas IPTABLE por seguridad.
Ahora a hacer un test desde un cliente usando el terminal:
y si logran accesar veran el siguiente mensaje en la consola:
Linux server 2.6.XX-XX #1 SMP Mon Dec 24 16:41:07 UTC 2007 i686
The programs included with the Debian GNU/Linux system are free software;
the exact distribution terms for each program are described in the
individual files in /usr/share/doc/*/copyright.
Debian GNU/Linux comes with ABSOLUTELY NO WARRANTY, to the extent
permitted by applicable law.
You have new mail.
fuente: https://richieblog.wordpress.com/2008/11/05/como-configurar-ssh-en-debian/
sábado, 8 de octubre de 2016
Cómo cambiar la password de root en RedHat (booteo)
http://datalibre.blogspot.com.ar/2012/06/resetear-password-de-root-en-red-hat.html?m=1
--
Javier A. Rodriguez
miércoles, 14 de septiembre de 2016
sábado, 23 de julio de 2016
Algunos links más que interesantes!!
jueves, 16 de junio de 2016
Bienvenidos a otro curso de redes!!
--
Javier A. Rodriguez
miércoles, 16 de marzo de 2016
Version de Linux en RedHat similar al famoso uname -a
Redhat Version or Release:
lsb_release -a
LSB Version: :core-3.1-amd64:core-3.1-ia32:core-3.1-noarch:graphics-3.1-amd64:graphics-3.1-ia32:graphics-3.1-noarch
Distributor ID: EnterpriseEnterpriseServer
Description: Enterprise Linux Enterprise Linux Server release 5.5 (Carthage)
Release: 5.5
Codename: Carthage
cat /etc/redhat-release
Red Hat Enterprise Linux Server release 5.5 (Tikanga)
cat /etc/enterprise-release
Enterprise Linux Enterprise Linux Server release 5.5 (Carthage)
cat /etc/issue
Enterprise Linux Enterprise Linux Server release 5.5 (Carthage)
Kernel \r on an \m
cat /proc/version
Linux version 2.6.18-194.el5xen (mockbuild@ca-build10.us.oracle.com) (gcc version 4.1.2 20080704 (Red Hat 4.1.2-48)) #1 SMP Mon Mar 29 22:22:00 EDT 2010
jueves, 28 de enero de 2016
No such file or directory? But the file exists!
viernes, 22 de enero de 2016
Fwd: Instalación de Oracle Linux 7
https://oracle-base.com/articles/linux/oracle-linux-7-installation#basic_installation
Oracle Linux 7 (OL7) Installation
Basic Installation
- Boot from the DVD. Use the up arrow to pick the "Install Oracle Linux 7.0" option and hit the return key.
- Select the appropriate language and select the "Set keyboard to default layout for selected language" option, then click the "Continue" button.Click the "I want to proceed." button on the pre-release software warning screen.
- You are presented with the "Installation Summary" screen. You must complete any marked items before you can continue with the installation. Depending on your requirements, you may also want to alter the default settings by clicking on the relevant links.Click the "Installation Destination" link.
- If you are happy to use automatic partitioning of the whole disk, click the "Done" button to return to the previous screen.If you want to modify the partitioning configuration, click the "Continue" button and work through the partitioning screens.
- It would be advisable to click on the "Software Selection" link and pick the following options if you want a GUI console.
- Base Environment > Server with GUI
- Add-Ons for Selected Environment > Compatibility Libraries
- Add-Ons for Selected Environment > Development Tools
Once you have completed your selections, click the "Done" button. - Once you have completed your alterations to the default configuration, click the "Begin Installation" button.
- Click the "Root Password" link.
- Enter the root password and click the "Done" button.Click the "User Creation" link.
- Enter the user details and select the "Make this user administrator" option, then click the "Done" button.
- Wait for the installation to complete. When prompted, click the "Reboot" button.
- Click the "License Information" link. Check the "I accept the license agreement" checkbox and click the "Done" button. When you return to the previous screen, click the "Finish Configuration" button.
- Decide if you want to use Kdump and click the "Forward" button.
- Decide if you want to set up software updates and click the "Forward" button. If you chose not to register with ULN, you will need to confirm you decision also.
- Click the "Forward" button.
- On the sign-in screen, click on the user you want to log in as.
- Enter the password and click the "Sign In" button.
- Accept the language by clicking the "Next" button.
- Accept the input sources by clicking the "Next" button.
- Connect to existing data in the cloud, or just click the "Next" button.
- Click the "Start using Oracle Linux Server" button.
- You are now presented with the console screen.
Network Configuration
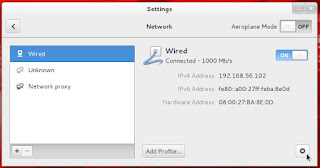
- If you are using DHCP to configure your network settings, then ignore the following network configuration screens, otherwise click the network icon on the top bar and click the "Network Settings" link. You are then presented with the "Settings" screen. Highlight "Wired", flick the switch to "ON" and click the cog icon at the bottom-right.
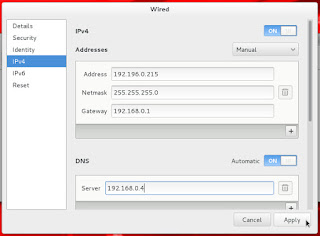
- Click the IPv4 option, select the "Manual" method and enter the appropriate IP address and subnet mask, default gateway and primary DNS, then click the "Apply" button.
- Close the "Network" dialog.
Customizing Software
- You can customize the installed packages using the "Software" dialog (Applications > System Tools Software).
SELinux
- If the OS is to be used for an Oracle installation, it is easier if Secure Linux (SELinux) is disabled or switched to permissive. To do this edit the "/etc/selinux/config" file, making sure the SELINUX flag is set as follows.
SELINUX=permissive
If SELinux is configured after installation, the server will need a reboot for the change to take effect.
Firewall
- If the OS is to be used for an Oracle installation, it is easier if the firewall is disabled. This can be done by issuing the following commands from a terminal window as the "root" user.
# systemctl stop firewalld # systemctl disable firewalld
SSH
- Make sure the SSH daemon is started using the following commands.
# systemctl start sshd.service # systemctl enable sshd.service
--


